
What is it, and why do you need it for WordPress?
What is Security hardening?
Security hardening is a collection of tools and techniques used to reduce the vulnerability of a system. The system in this case being your WordPress website.
Why do I need to harden my WordPress security?
There are over 260 million self-hosted WordPress websites on the internet.
This makes WordPress a very attractive target for hackers.
Getting hacked can have massive repercussions.
- Some pretty big companies have had data breaches where sensitive customer info was leaked, such as passwords and email addresses.
- Websites have been injected with malware that send visitors to dodgy and spammy websites.
- Google blacklists websites that are flagged as containing malware, preventing them from running Google ads.
- Once a website has been blacklisted, it can be very difficult to get it removed from a list. Many antivirus and web security companies will proactively blacklist websites found on partner and competitor lists. Some unlucky people have been caught in a loop where they are added to a new blacklist, even after the malware has been cleaned up.
But why are small business websites getting targeted?
In most cases, the hackers aren’t targeting you directly, there are scripts, bots and other automated processes, that look for weak targets and try to exploit them.
Hackers want to steal your ad spend, or add your website and server to their botnet, or maybe the hackers want your clients private data.
Follow these steps to improve your WordPress Security
Step 1. Keep WordPress core, themes and plugins updated.
Hackers actively search for vulnerabilities to exploit and the vast majority of websites that get hacked fall victim to a vulnerability in an outdated plugin.
WordPress 5.5 introduced automatic updates for themes and plugins, but be careful with automatic updates. If an update introduces a plugin conflict, your website could break, this could result in it going down or not rendering correctly.
We recommend you subscribe to the PatchStack security or iThemes security blogs for their monthly vulnerability round-ups.
Step 2. Secure login pages and disable XML-RPC.
The default WordPress login page, (domain.com/wp-admin) is a soft target for bots trying to brute force their way into your website. A brute force attack is when a bad actor (human or robot) will try different passwords till they eventually break in, crash the server, or get blocked.
We left the default WordPress login page exposed on a site with moderate traffic for 10 hours, while we logged failed login attempts.
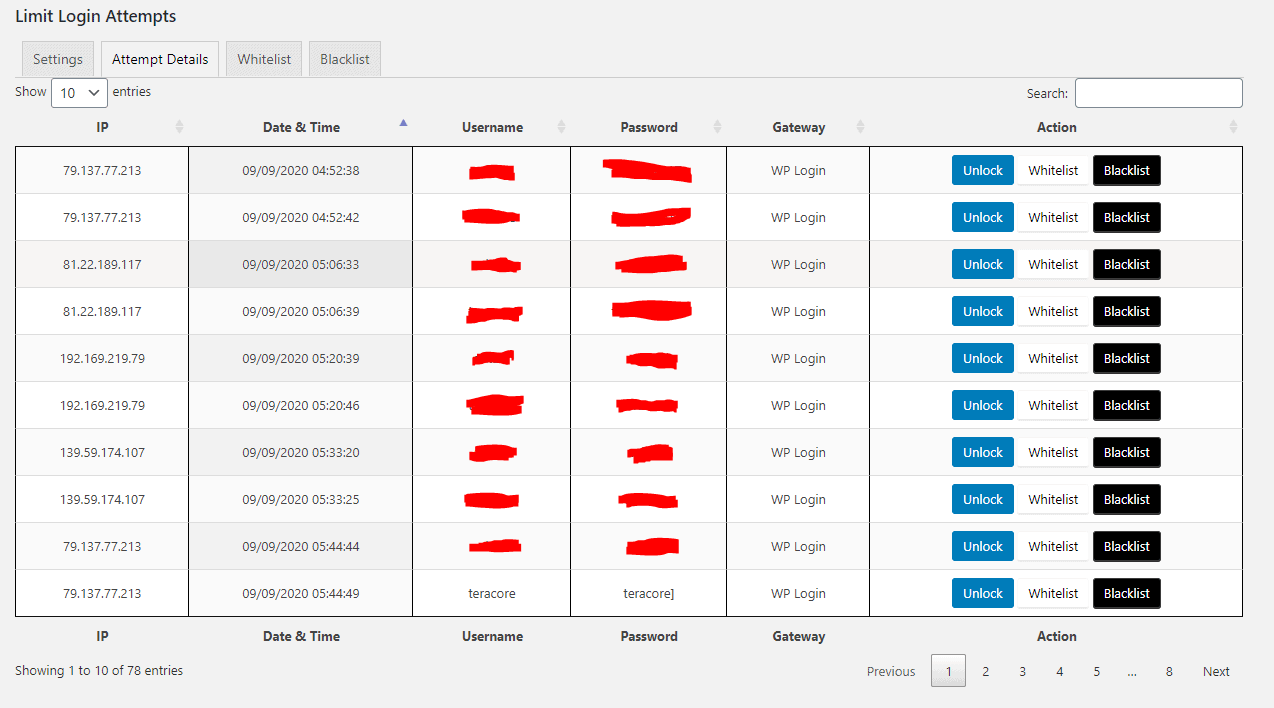
After 4 failed attempts, the IP address trying to log in will be blocked for 20 minutes, limiting the amount of guesses the hackers get. 78 failed attempts were recorded in those 10 hours before we moved the login page.
Had we not limited the attempts, a bot could try thousands of passwords draining your server resources, and if the passwords were weak they might even break in.
XML-RPC is a method that WordPress uses to communicate with different apps. It’s normally used to add content to your site in bulk, so hackers exploit XML-RPC in brute force attacks. Most apps will use the REST API to fill that role now, but some plugins do require XML-RPC (jetpack). For the most part it’s an unnecessary liability so turn it off.
To move the default WordPress login page and disable XML-RPC you can use one of these plugins.
- Login Press Pro – Premium
- PerfMatters – Premium
- iThemes Security – Premium
Step 3. Set user account permissions, enforce MFA and require strong passwords.
We think it’s a good idea to follow, ‘The Principle of least privilege’, when it comes to giving users access to any system.
The principle states: A user should only be granted the information and resources that are essential to performing their task.
Your client, who occasionally writes blog posts, should not have admin privileges to install plugins, delete pages, or change themes.
MFA – multifactor authentication, or 2-factor authentication requires a secondary validation method before you can access your account. It could take the form of a hyperlink in an email, a text message containing a one-time PIN, or a time-limited authentication code produced by an authenticator app on your mobile device.
You can add MFA to your website with these plugins:
- iThemes Security – Premium
- PatchStack – Premium
- WP White Security 2FA – Free
Strong passwords are harder to crack. Use a password manager like LastPass to generate and store your strong random passwords.
Step 4. Configure a back-up solution.
- All in One Migration
- BackupBuddy
- BlogVault
- Duplicator
- UpdraftPlus
- WP Reset
- WPVivid
If you need a free plugin, we recommend Updraft.
If you already use iThemes security then you should enjoy Backup Buddy.
BlogVault provides a solid service, but gets pricey at scale.
WP Reset is a different kind of backup plugin; we wouldn’t recommend it as a stand-alone solution.
ServMask’s ‘All in One WP Migration’ with daily backups sent to Google Drive is one solution we are fond of.
Step 5. Install a security plugin.
- iThemes Security – has an unlimited site plan and for extra value you can get the iThemes tool kit, which includes all the iThemes plugins at a reduced price.
- Securi – Very expensive, and the quality has dropped since they were acquired by GoDaddy
- WordFence – good free option
- PatchStack is our favourite solution because it offers both a Web Application Firewall (WAF) and virtual patching.
Step 6. Get a Firewall.
- 7G – Free, but not the easiest to set up.
- ModSec – Open Source but not easy to set up.
- PatchStack – Install the WordPress plugin, and you’re good to go.
- Cloudflare – Firewall, DDoS Protection, image optimization and a CDN in one!
Step 7. Monitor your website.
Uptime Monitoring
- Uptime Robot – 50 monitors for free
- Better Uptime – The solution we use at Teracore.
Track and monitor activities on WordPress.
- WP Activity Log – feature-packed but expensive.
- PatchStack – Logs aren’t that in depth.
- iThemes Security – you can use iThemes Security to keep a log of user activity and check for file changes on the website.