Increase your productivity and security with these LastPass tips and tricks.
Reading time 20 minutes.
TL;DR – Too long; didn’t read
You can Streamline and tweak LastPass to suit your workflow and security needs. LastPass can also increase your productivity with some tools that make routine security processes quicker and easier to implement and use.
- Edit Your LastPass preferences – Read about preferences here
- Move your saved passwords out of your browser and into LastPass
- Use the LastPass password generator
- Let LastPass fill in check-out forms for you.
- Add Secure notes to LastPass
- Share Passwords through LastPass, not email, Whatsapp or sticky notes.
LastPass Tips Time
Intro
LastPass will increase your password security, but it can be a daunting task adding and updating all of your passwords. In this tutorial I’ll show you how I use LastPass to reduce the time spent on admin.
In this tutorial:
- Edit your LastPass preferences
- How to copy your passwords saved to your browser into LastPass
- Disable password saving in your browser – leave that to LastPass
- Use the LastPass strong password generator
- Setting up credit card and other form fills
- Adding documents and secure notes to your Vault.
- Sharing passwords and secure notes
Disclaimer
These tutorials we written for computers running Microsoft Windows 10.
Unless otherwise stated, the browser being used in the tutorial is Google Chrome. If things do not look exactly the same, you can’t find a specific feature on your operating system, or if your preferred browser isn’t covered here – tell us about it.
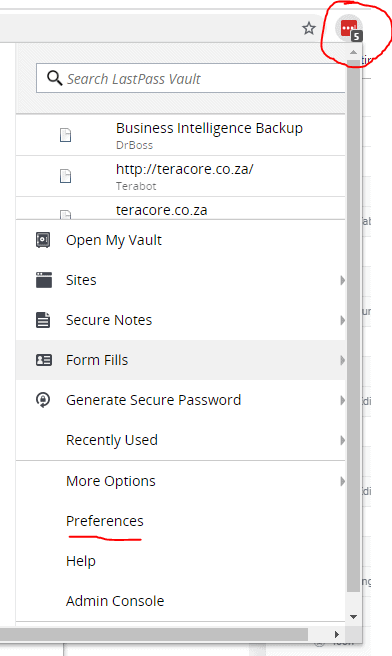
1. Edit your LastPass preferences
From the LastPass preference menu, you can manage your General, Notifications, Hotkeys, Advanced, and Icons settings.
To access the preference menu, click on the LastPass icon on your browser menu bar and select ‘Preferences’ from the pop-up menu.
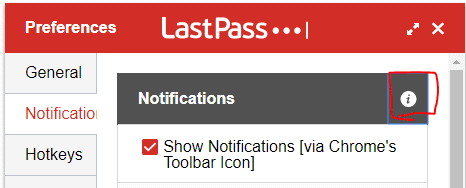
The preferences are not shared between devices, so if you use LastPass at work, you would probably want stricter security than on your home computer, or if you share a home computer you might want to have strict security there too.
You can click on the Information Icon next to each heading to get a detailed explanation of what the settings do.
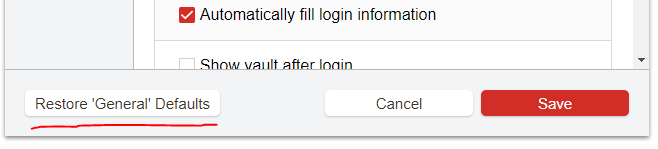
Once you have finished changing your preferences, remember to click on save. If you change a some settings and don’t like the result, you can reset each section to it’s default by clicking on the Restore Defaults button.
2. Move Passwords saved in your browser to LastPass
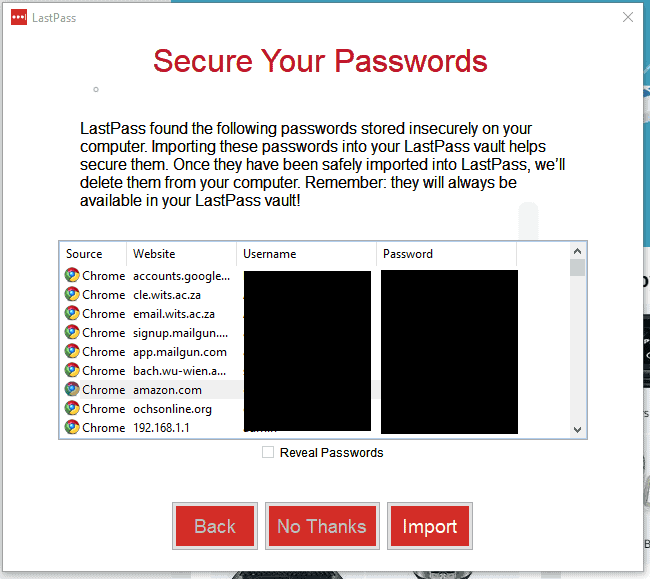
Most modern browsers have a their own built-in password managers, while these can be convenient, they are not as secure and robust as LastPass and they can interfere with how well LastPass works.
You need to turn password saving and autofill off in your browser and leave that job to LastPass. For some extra security, you can delete all the passwords saved to your browser, after you have added them to LastPass.
You can do this automatically when installing the LastPass desktop app, or manually for each individual browser.
LastPass Desktop App
When you install the LastPass desktop app, you will be prompted to install the LastPass extension for all available browsers on your computer, it will also scan for insecure passwords and ask you if you want to move them to your vault and delete them from your browsers.
Google Chrome
- Click on the Google Chrome menu button at the top right corner of your browser.

- Select “Settings” from the drop down menu.
- From the settings page, scroll down to the autofill section and click on Passwords

- Turn ‘Password saving’ and ‘Auto Sign-in Off’. If it’s blue it means it’s on.
You can also disable ‘payment methods’ and ‘addresses’ if you are going to use LastPass to fill these too. 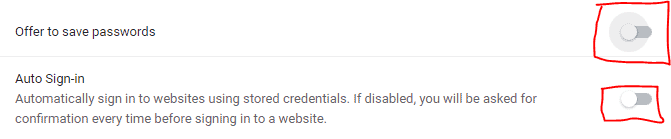
- Scroll down a little and you should see your saved passwords
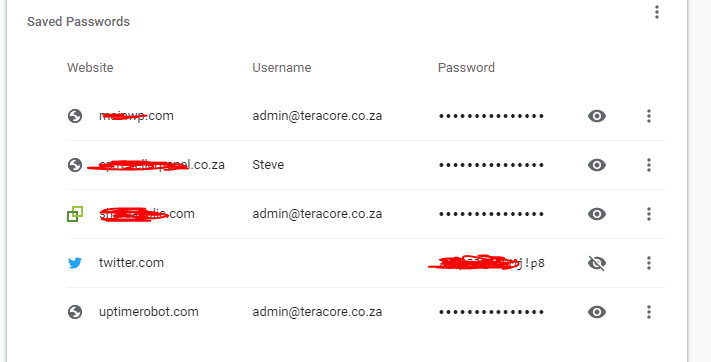
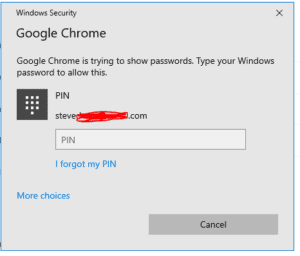
- Click on the eyeball icon next to a password to view it.
- You might be prompted to enter your computer Pin or Password.
- From here you can view all the passwords you have saved to Chrome.
The easiest way to add a password to LastPass, is by logging into your account for that website while the LastPass browser extension is active, and clicking “Add” when prompted.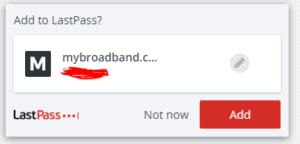
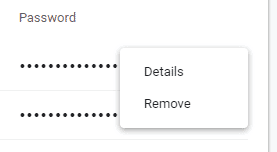
- Once you have added the account to LastPass, you can remove the saved password from Chrome.
Click on the “More actions” button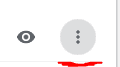 and select “Remove”
- Now add your remaining passwords to LastPass and remove them from chrome.
This will reduce the chance of duplicate and misplaced passwords.
Microsoft Edge
- Click on the Microsoft Edge menu button at the top right corner of your browser.

- Select “Settings” from the drop down menu.
- Click on Passwords and Autofill.
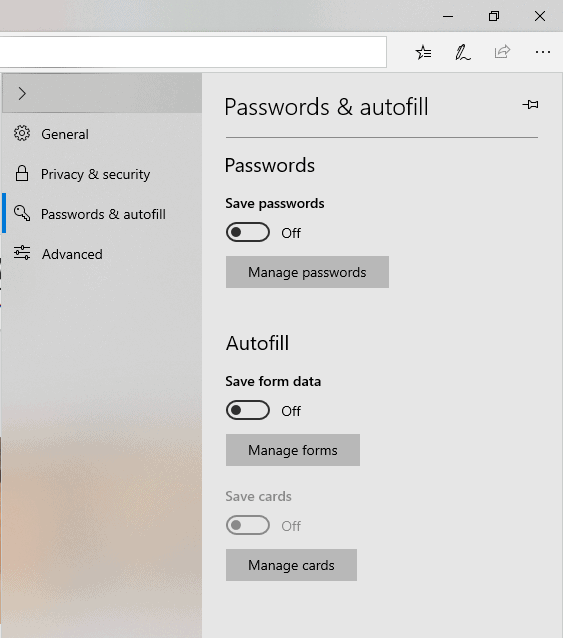
- Turn Password saving , Autofill and Save cards off.
- Click on “Manage passwords” to see the list passwords that have been saved to Edge.
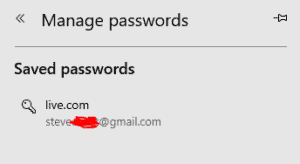
- If you click on a password it will show you more details or give the option to remove it.
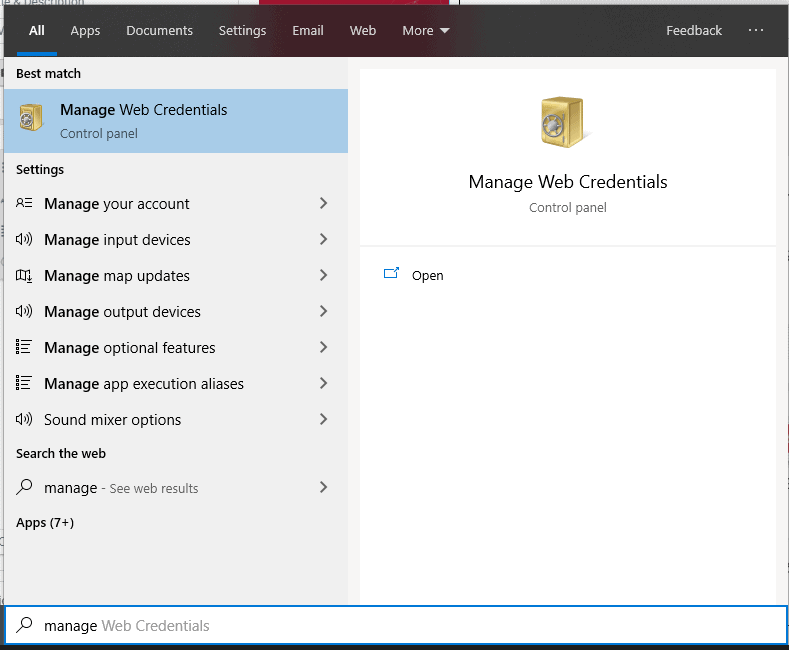
- To view the actual password, you have to access your “Web Credentials” from the Windows control panel. A quick way to get there is to search in windows for “Manage Web Credentials”
- Click on the URL you would like to view the password for.
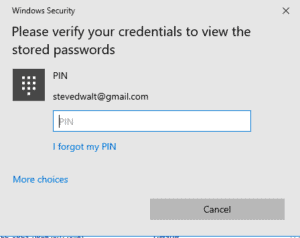
- You may be prompted to enter your computer password or pin.
- The easiest way to add a password to LastPass, is by logging into your account for that website while the LastPass browser extension is active, and clicking “Add” when prompted.
- Once you have added the account to LastPass, you can remove the saved password from Edge.
- Now add your remaining passwords to LastPass.
This will reduce the chance of duplicate and misplaced passwords.
Microsoft Internet Explorer
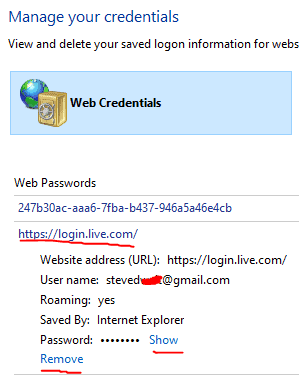
- To view passwords saved in Internet Explorer, you have to access your “Web Credentials” from the Windows control panel. A quick way to get there is to search in windows for “Manage Web Credentials”
- Click on the URL you would like to view the password for.
- You may be prompted to enter your computer password or pin.
- The easiest way to add a password to LastPass, is by logging into your account for that website while the LastPass browser extension is active, and clicking “Add” when prompted. So log into the account from a browser that has LastPass installed.
- Once you have added the account to LastPass, you can remove the saved password from Internet Explorer.
- Now add your remaining passwords to LastPass.
This will reduce the chance of duplicate and misplaced passwords.
3. Use the LastPass strong password generator
A Strong Password is one that is hard for both humans and bots to crack or guess.
- It should consist of at least sixteen characters.
- It should contain a combination of letters, numbers, and symbols (@, #, $, %, etc.) if allowed.
- It should contain letters in both uppercase and lowercase.
- It should not contain words that can be found in a dictionary or names.
- It should never be reused.
1AEDb&khq8^1rHNY is a good example of a strong password, and LastPass has a handy feature that generates and saves these types of passwords for you.
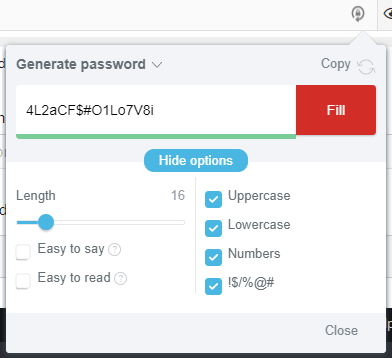
Create a strong password with the LastPass secure password generator.
If you need a password for a new account, or if you need to update a password on an old account, you can use the LastPass password generator, to quickly create and store secure passwords for you.
When you are creating a new account on a website, updating a password or doing a password reset, if you have the LastPass browser extension installed and you are logged into your account, password input boxes now have a little lock icon on them.
Left-click on the lock icon to bring up the password generator.
Click ‘Generate and fill’ to use the default settings to create a password.
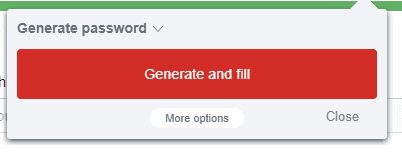
Click on ‘More options’ to set the length and character sets your password will use. This is helpful on websites that have restrictions on special characters and numbers in passwords.
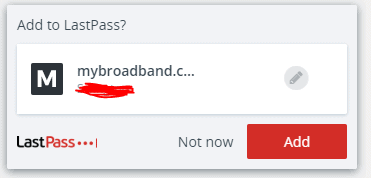
After you’ve clicked ‘Fill’ you should have the option to add the password to LastPass.
4. Card and Form Fills
You can use LastPass to save your address and credit card details, to fill check out forms for you automatically. This should help you get those deals on Black Friday, and makes it easier to share card details with employees, business partners or family members.
Make sure you have Multifactor Authentication active on your cards, MFA will protect you from card cloning and card skimming.
To add a new form or card fill, click on the LastPass icon in your browser menu and click ‘Open My Vault’ on the pop-up menu.
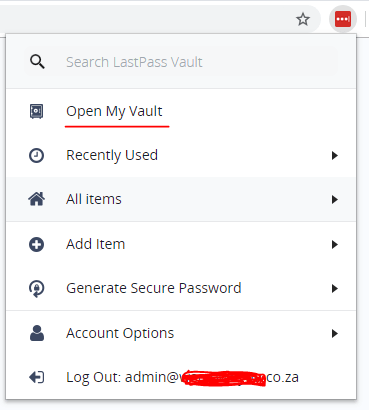
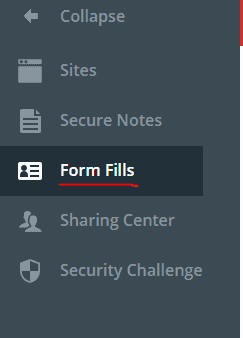
From inside your vault, click on ‘Form Fills’ on the left menu.
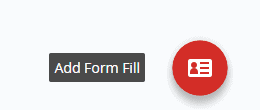
Then click on the ‘Add Form Fill’ button at the bottom right corner of your screen.
From inside your vault, click on ‘Form Fills’ on the left menu.
You can save multiple form fill profiles, for example if you have a business and a residential address, or if have multiple debit cards.
LastPass can save your personal details, credit card details, contact details and addresses. When you need to fill in an online form, make LastPass do it for you automatically, saving you time and making sure no errors creep in.
At the top of the form fill box you will see; Name, Type and Language.
Name is what this Form Fill profile will be called, if you just want to save your home address, you can call it Home Address, set the type to ‘Generic’ and fill in your Address Details.
If you want to save a credit card, change the type from ‘Generic’ to ‘Credit Card’.
*not all credit cards have a start date or issue date, you can leave those blank.
Tick the ‘Require Master Password Reprompt’ box if you want it to ask for your password before it fills in forms.
Setting up ‘form fill profiles’ can speed up your workflow and reduce admin by automatically filling in your saved details.

5. Secure notes and Documents
You can also use LastPass to store Multi-factor recovery codes, WiFi passwords, PIN codes, or even use it like a digital safe for important documents and notes.
Open your LastPass vault and click on ‘Secure Notes’.

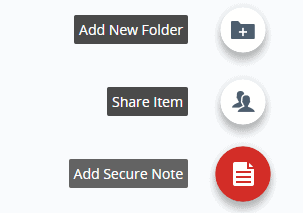
Then Mouse over the + icon at the bottom right corner of your screen and click on the ‘Add Secure Note’ button
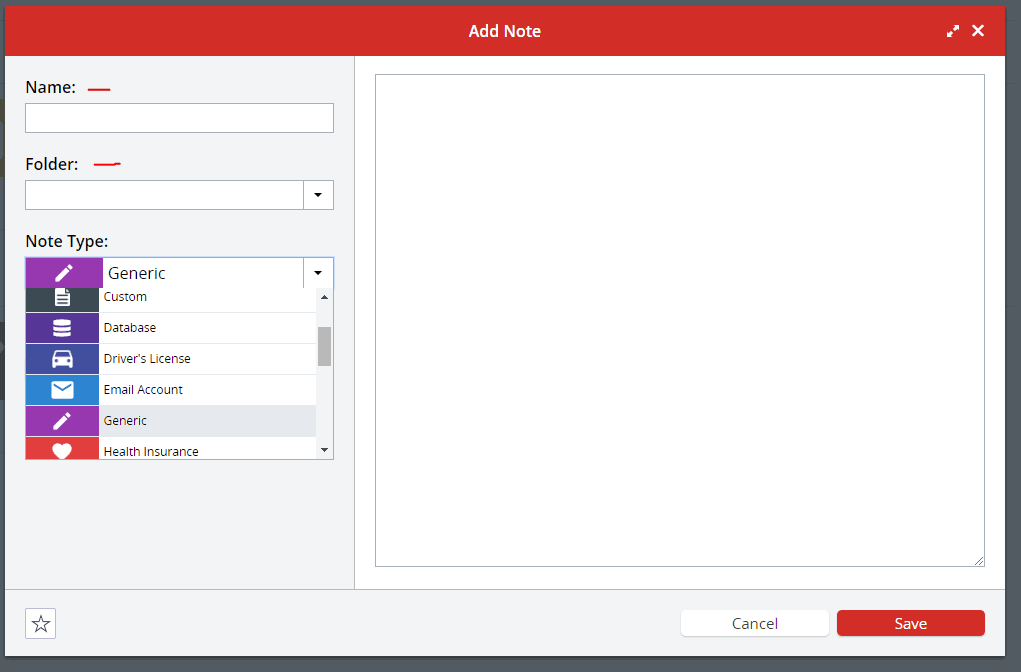
There are various different types of notes you can add to your vault, from generic notes, to policy documents, ID’s, Drivers licenses, etc.
When adding a new note, you can give it a unique name and assign it to a folder, the notes are searchable, so label them appropriately so that you can find them easily later.
6. Password sharing
Sometimes you will need to share passwords, either with coworkers, clients or your friend who is too cheap to get his own Netflix account.
LastPass makes password sharing easy and secure, and allows you to share the password without letting the recipient view it, so you can revoke it later.
You can also set up shared folders allowing you to share notes and passwords with people you invite to the folder, making it easy to share notes, docs and passwords across your company or with your family.
To share a password:
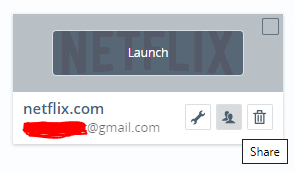
Go to your LastPass vault, mouse over the item you would like to share and click on the Share icon.
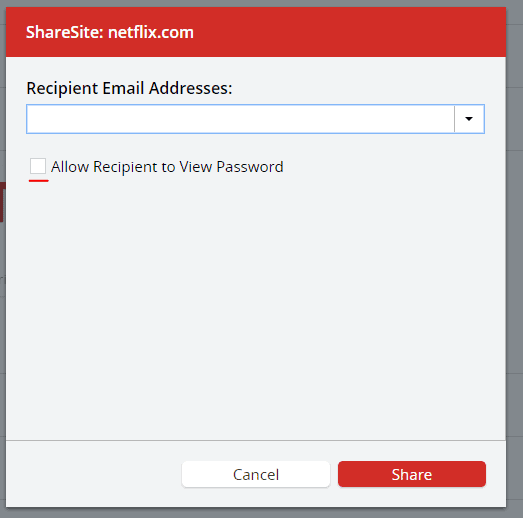
Enter the email address you would like to share the password with, if you would like the recipient to be able to see what the password is, tick the box and then hit share.
Please note – The Recipient will need a LastPass account to be able to use the shared password.
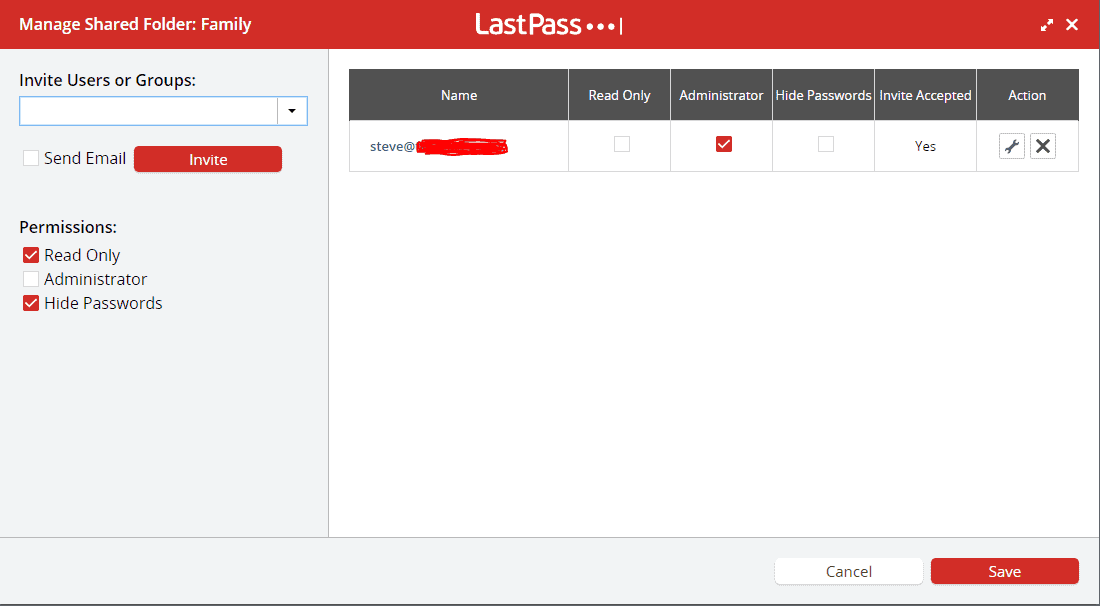
To create a shared folder:
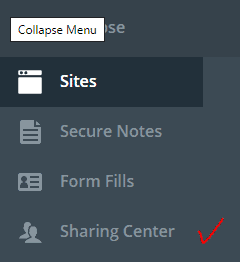
Go to your LastPass Vault and click on the ‘Sharing Center’
From the sharing center you can create and manage your shared folders, and view the passwords you have shared or that have been shared with you.

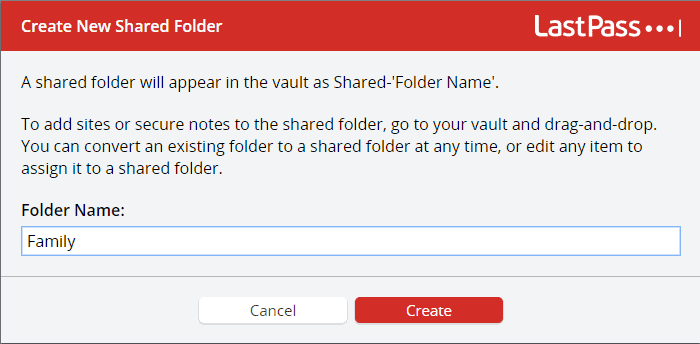
Click on ‘Manage Shared Folders’ and then the red + icon on the bottom right corner.

You will be prompted to give your folder a name. In this example I’m setting up my Family shared folder, but you can name your folder anything you like, so name your folder and click create.
Mouse over your newly created folder and click on ‘Manage’.
Enter the email address of the person you would like to invite to the folder, tick the send email box and click invite.
Setting ‘Read Only’ permissions means that the people you invite to the folder will not be able to edit the password inside of LastPass.
‘Administrator’ permission will allow them to edit anything, so best leave that unchecked.
Ticking ‘Hide Passwords’ will prevent the people you invite from viewing the passwords, but they will still be able to gain access to those sites by logging in with the details saved in the shared folder.
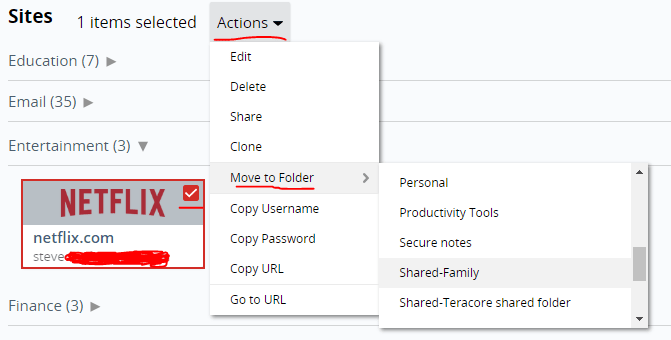
To move passwords and notes to the shared folder, you can drag and drop them into the shared folder, or you can select the item (or items) you will know that it is selected with the tick in the corner, then from the ‘Actions’ drop down menu select ‘Move to Folder’ and select the shared folder you created.
Summary
Hopefully these tips will help you move all your passwords to LastPass faster, create new strong passwords for all your accounts and make password sharing easier and more secure.
For a step by step tutorial on how to setup LastPass click here.
You can increase your security even more with Multi-Factor-Authentication learn how here.